|
PART III: The
ANIMATION |
|
Step 20: Flying Through Space |
 |
All we have left to do is bring our spaceship into our space scene and make
it move. While intricate and complicated animations are certainly possible in
Photoshop, let's do something simple so we can get an idea of how creating
movements in Photoshop works. Keep in mind that the same process we are about to go through can
be expanded to make the animation as complex as we want.
- Open your Space file in Photoshop
- Press Ctrl+Alt+A to Select all of the layers and layer groups and
then press Ctrl+E to merge all layers together
At this point we should save a new version of our space scene so that our
Space file (that contains all of our separate layers) will still be saved in
our folder in case we want to make changes to it at a later time (and so that
our work up to this point can be graded).
AGAIN,
DO NOT SAVE YOUR SPACE FILE WITH THE
LAYERS MERGED -
YOU WILL NOT BE ABLE TO SEPARATE THE LAYERS LATER
AND YOU WILL LOSE POINTS WHEN YOUR WORK IS GRADED!
-
Click File then click Save As... and make sure you
are in the Photoshop folder within your main folder
-
Change the file name to step20.psd
-
Click Save - notice that the title bar for your image now
says you are working with the step20.psd file...

This is good...this is what we want
This means that we now have our step20.psd file with a single layer saved in
our folder, but also have our original Space.psd file in our folder with all of
the separate layers still intact. Now let's get our spaceship into our space
scene.
- Rename the layer you merged in direction 2 to Space
- Open your Spaceship file in Photoshop
- Position your two files so you can see them both at the same time
- Using the Move Tool, click on your spaceship and drag it onto your
Space file - notice that Photoshop places your spaceship in a new layer
group...
- Right-click the layer group containing your spaceship and click
Merge Group...

Your spaceship should now be sitting on a normal layer
- Rename the new layer containing your spaceship to 1 (yes, just the number
1 - I'll
explain why in just a second)
- Close your Spaceship file - if Photoshop asks if you want to save
changes choose No
Your wonderful spaceship image should now be floating somewhere in your space
scene...
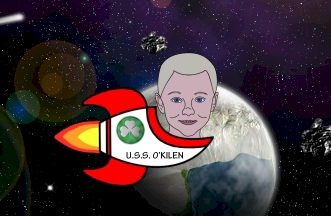
OK, let's get everything into place so we can start flying.
-
Determine how large you want your spaceship to be
- I am going to leave mine the size it is - feel free to make yours smaller if
you wish (DO NOT make it larger), but be sure that no matter what size
you make it that you can still read your name easily
We now need to move our spaceship into the correct position to
start our timeline.
- Using the Move Tool, click and drag your spaceship all the way to the left
of your image until it is off of your canvas and out of your space scene - yes, we want it to be out
of the picture to the left (don't worry, you are not getting rid of it, just
moving it so far to the left that it can't be seen)
This may seem like an odd way to start, but we want our ship to appear to
come in from the left and fly off the right, so we need to start with it off the
screen to the left then have it gradually appear as it flies. If you are not
getting this, don't worry - you will understand as we do this.
One quick word of advice: if your window looks like this...
You may notice that you are unable to drag your spaceship off the left side
of your image. Don't panic - nothing is wrong. This is simply because there is
no space around your image for the spaceship to go into. The fix for this is
easy: click on the title bar of your window and drag the window up until your
cursor is at the very bottom of the Option bar. You will notice that your image
will turn almost transparent and that a blue line will pop up along the bottom
of the Option bar and down the side of the Tools panel...

This blue line indicates that when you release the mouse that your image will
occupy the entire Photoshop window. Release the mouse - your image should now be surrounded by gray
(if not, simply zoom out a little bit) and you can now drag your spaceship off
your canvas and out of your space scene.
We now need to create additional layers and gradually move our
spaceship across the screen.
- Right-click the 1 layer and click Duplicate Layer
- Name the new layer 2 (yes, just the number 2)
- Use the Move Tool to click and drag your spaceship to the right
until you can just see the side of your head...
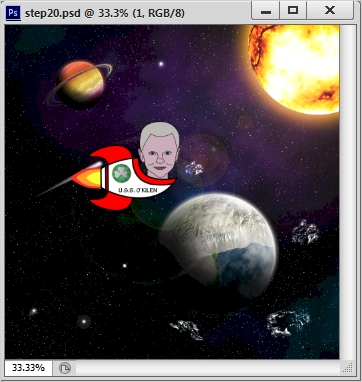
- Repeat the above three directions over and over and over and over
and over and over, each time moving your spaceship little by little to the
right and naming each new layer you create in sequence (3, 4, 5, 6,
etc.) until your spaceship is no longer visible off the right side of your
image
Try to move your spaceship by the same amount each time so that the animation
runs smoothly. If you move it too far on any of the new layers then your ship will
appear to leap great distances as it flies through space. When you reach the other side
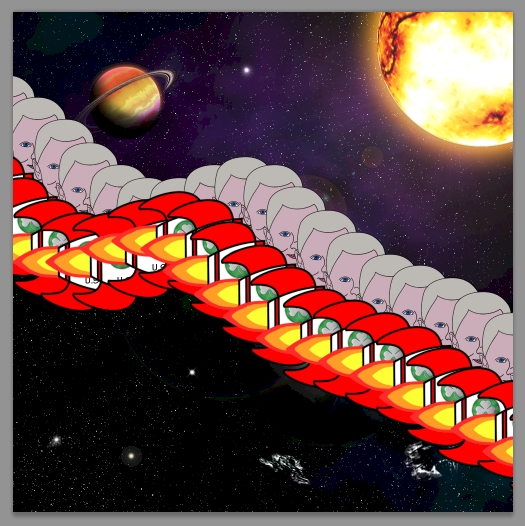
of your space scene you should have multiple
numbered layers and your image should look something like the image below...
Remember that your spaceship can follow any path you like - you can even have
it do loops or get smaller so that it appears to fly away from us, then larger
again if you want. You can even have it disappear behind one of your planets (be
sure to make it really small at it goes into orbit) and appear on the other
side.
Time to create the animation timeline.
- Click Window then click Timeline to activate the Timeline
panel - this should display at the bottom of your screen...

You want it to look like the image above - which is called frame animation view
- which is showing you each frame of
your timeline; if your Timeline panel looks like this...

don't worry, you can switch to the frame animation view by clicking the little button
in the bottom left-hand corner of the panel that looks like three little
gray boxes...
If you get a message that says 'This will convert the timeline to a frame
animation.' simply click Continue
- Be sure you are in frame animation view
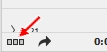
- In the Layers panel, turn off the visibility of every layer
except Space and layer 1 - note that you can quickly turn off
the visibility of multiple layers by clicking on the first layer visibility
icon and dragging up across the rest of them...
Photoshop will automatically scroll up when you reach the top of your layer
stack so you can turn off the visibility without having to click multiple
times
Notice at this point that the thumbnail on the Timeline panel no longer has
all of the spaceship images and should now only be your space scene (remember
that you can't see your spaceship on layer 1 because it is off the image to the
left)
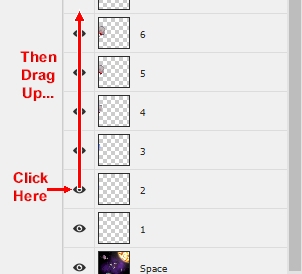
- Click the fly-out menu in the top right corner of the Timeline
panel...

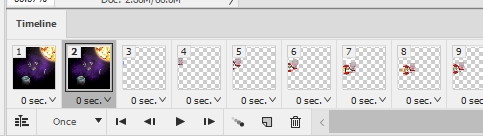
- Click Make Frames From Layers...
After thinking for a second, Photoshop will create frames in the timeline from each of your
existing layers...

As you can see above, our new frames are simply our spaceship/head at
different positions in our space scene. You can scroll to the right in the
Timeline panel to confirm that you have the same number of frames as you do
layers. Photoshop was able to create these frames in sequence because we named
our layers in numerical order
(meaning 1, 2, 3, etc.). See, I told you we had a reason for naming
them the way we did.
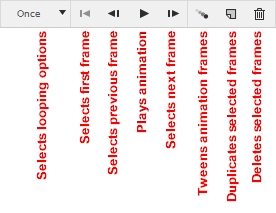
Let's take a second to look at the
animation control buttons
that sit at the bottom of the
Timeline
panel...
Let's play our animation now and see what we have so far.
- Click the Plays animation button and watch your image - you should
see the space scene pop up then disappear, and then your spaceship should fly across the
screen on a transparent background (this is what we want at this point)
- Click on frame 2 in the Timeline panel then turn the visibility
of the Space layer on - notice that you can now see the space scene in
both frames 1 and 2 but not in the other frames...
- Click on frame 3 then press and hold the Shift
key on the keyboard and click on the last frame of your timeline -
this should select all frames EXCEPT frames 1 & 2 (the selected frames should now be highlighted in
gray...

- Release the Shift key
- Turn the visibility of the Space layer on
- Click the Plays animation button once again - your spaceship should now be
flying through space in each frame
Note that what you see on each frame of the timeline depends on which layers
are visible in each frame, and that you can make different layers visible or invisible on
different frames of your timeline.
You may notice that your spaceship is moving really fast - this is because we
have not set the frame delay time (or how long each frame should stay on the screen before
being replaced by the next frame) for each frame yet. Let's do that now.
- Click on frame 1 then press and hold the Shift
key on the keyboard and click on the last frame of your timeline to
select every one of your frames
- Click the Selects frame delay time button on frame number 1
(the button circled in the image below)...
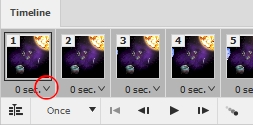
- Click 0.1 seconds...
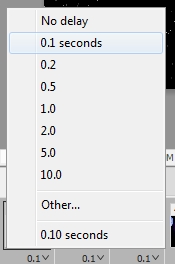
This will set each frame in your timeline to flash on the screen for 0.1
seconds before being replaced by the next frame
- Click the Plays animation button - your spaceship should now be
flying through space at a nice speed
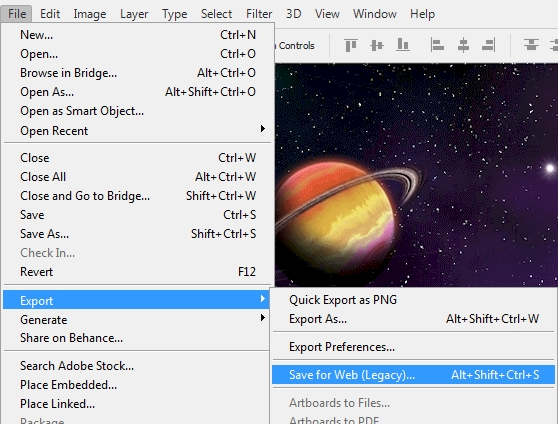
We now need to save our animation.
- Click File and then click Export and then click Save for Web
(Legacy)...
This will open the Save for
Web window...
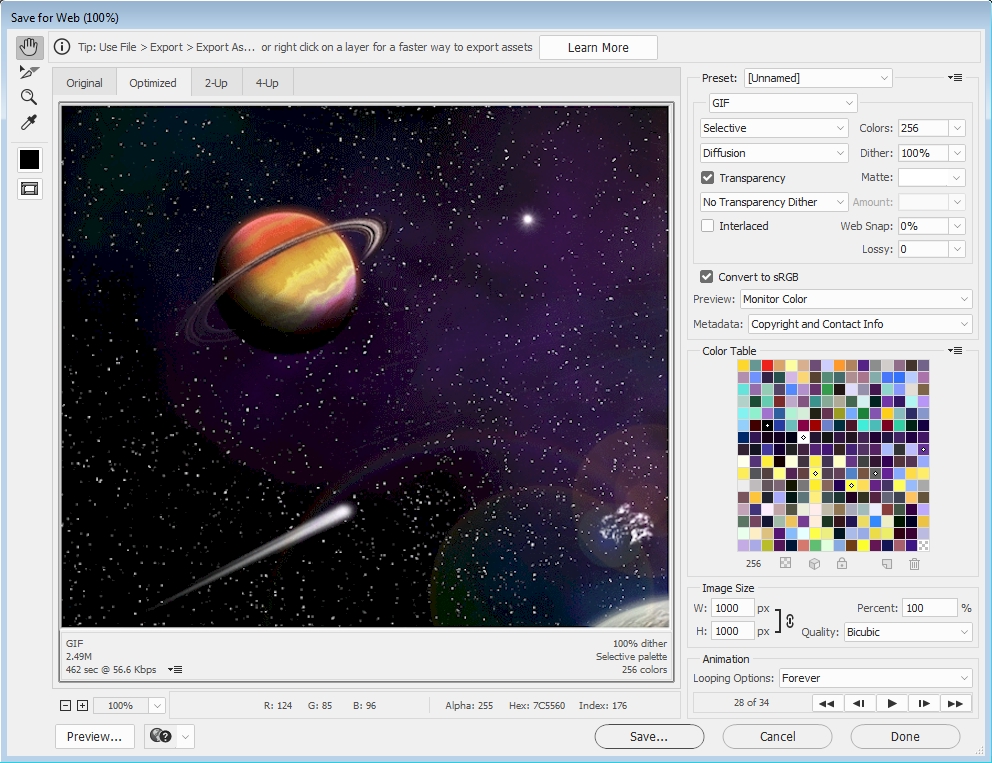
- Make all of the setting match the options selected in the image above
Keep the following in mind:
- The GIF setting means the image will be saved in a format that allows it to
be an animated image
- Setting
Looping Options: to Forever means the
animation will repeat non-stop
- The maximum
setting for Colors is 256 because that is the maximum number of colors the GIF
file format allows
- Dither is the process where two
colors that are present in the image are placed next to each other to make it
look like a third non-present color is there, so we end up with an
image that appears to have more colors in it than it actually does
- Click the Save button
- Go to your student folder and go into your Photoshop
folder and name the file Final (Photoshop will add the .GIF extension
automatically)
- Click the Save button - Photoshop will think for a second and then
your image will be saved
Let's have a quick look at our image to make sure everything saved correctly and
it works like it should.
- Go to your Photoshop folder inside your student folder and
right-click on your Final file then point at Open with
and click Internet Explorer...
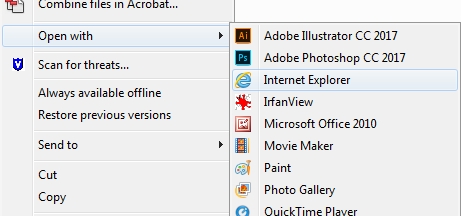
Actually, you can use any browser you want to open the image
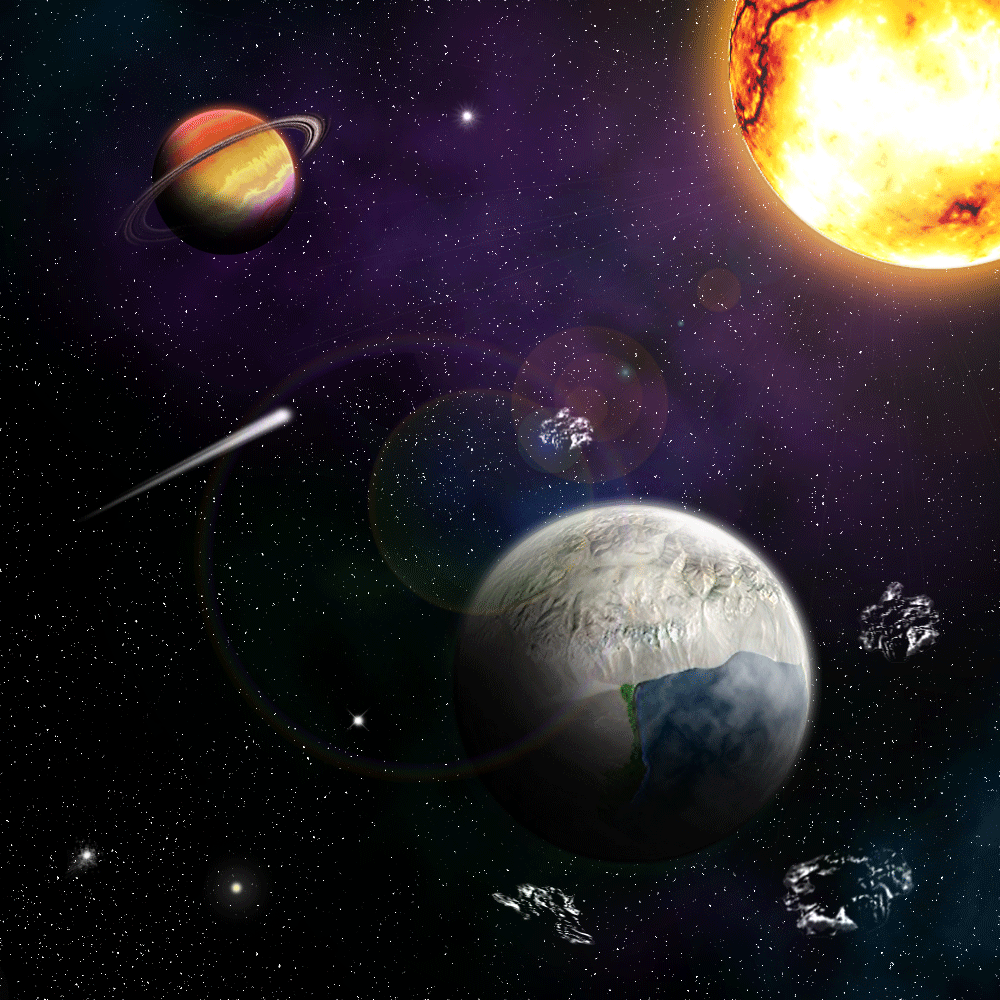
- You should now be able to see your flying spaceship...
If you are not flying through space, or if you do not have a smooth animation,
return to Photoshop and correct any problems
- Close the browser
- Save your step20.psd file (remember, you should NOT be
saving the work you did on this step as Space!)
We are now done with the Astronaut Space Scene project - good job!
- Close your image
- Close Photoshop
|
Hey, you're done! Way to go - I knew you could do it!
Hopefully by now we have learned that if we read and follow the directions
that this stuff is really easy.
If you have completed this project ahead
of the deadline, now is your chance to add in some additional details to
make your space scene stand out from the rest. A bunch
of great ideas and some additional instructions on how to do them can be found
on the super secret bonus Step 21 page.
Shhhhh...don't tell anyone about it.
|
01 |
02 |
03 |
04 |
05 |
06 |
07 |
08 |
09 |
10 |
11 |
12 |
13 |
14 |
15 |
16 |
17 |
18 |
19 | 20