|
PART II:
The Space Scene |
|
Step 09: Getting Started on the Space Scene |
 |
OK, let's put your head aside and use some new tools to create an amazing,
dazzling space panorama.
Here are a few things to keep in mind as you work through the remaining Steps
of this tutorial:
- Since we have already discussed what many tools
do and why we are using them, these directions will not go into detail about
any tool we have already used (if you can't remember what a tool does or why we are using it,
go back to the step it was covered and refresh your memory)
- Continue to work
through the directions step-by-step
- Once a technique has been described it will not be described in future
steps that use it - you will have to actually remember how to do it
- Your image WILL NOT LOOK EXACTLY LIKE THE ONES
THAT ARE SHOWN AS EXAMPLES IN THE TUTORIALS - this is ok and is actually
what is supposed to happen; your stuff is supposed to be different and
unique
- The directions are in the order they are in on purpose - work
the steps in this order to make sure everything comes out like it should
- There are usually several different ways to do everything in Photoshop,
and we will generally cover only one way to accomplish each task, and not
always the easiest way - keep in mind that we are interested in learning as
many of the tools as we can so we can use them in a variety of situations in
the future
- Save your work often in your student folder as
Space
- Your space scene will be a LARGE, complicated
file when you are finished - work through the steps CAREFULLY and read
all of the DIRECTIONS!
Follow along with the directions and you should end up with an amazing
image. We need to start a new document that is large enough to fit everything we
are going to be doing in this part of the project.
- If you still have your Head file open go ahead and close it now - we
will not need it again until Step 19
- Open Photoshop and click File then New... to begin a new document
- We want a large image, so change the settings (these are on the right
side of the New Document window) to the following...
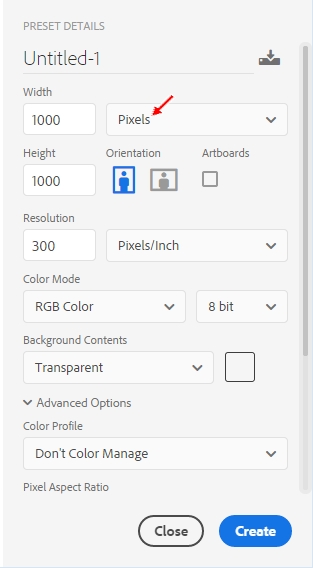
Be sure your settings exactly match those above as they are very important;
for example, by choosing Transparent for Background Contents we will avoid
having a locked background layer like we did when we created our face
Be certain your Width and Height are set to Pixels (red arrow above) and NOT Inches (or any
other setting). If you make a 1000 inch square image you are creating a
graphic that is over 83 FEET wide. Yeah, that will crash Photoshop.
- Click Create
Photoshop should open a new blank image and name it Untitled-1. This is
actually a very common name for Photoshop images as this is the default name
given to all new images created in Photoshop and will remain the image's
name unless you change it.
- Save your file in your Photoshop folder as Space
|
READ THE DIRECTIONS! You can
ONLY get credit for
doing the work if you read and follow the directions YOURSELF!! |
Our first step in creating an amazing space panorama is to create a field
of stars.
01 |
02 |
03 |
04 |
05 |
06 |
07 |
08 | 09 |
10 |
11 |
12 |
13 |
14 |
15 |
16 |
17 |
18 |
19 |
20