

| Step 2: The EYES |
Step 1: A New Me | Step 2: Eyes | Step 3: Hair | Step 4: Ears | Step 5: Mouth | Step 6: Nose |
We will replace both of your eyes, but do so one at a time. This will make it easier to smooth out the edges and blend in the color.
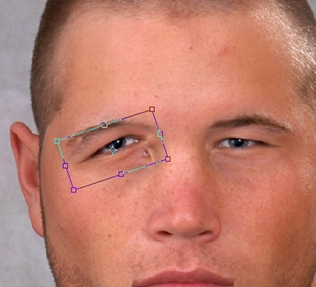
Remember that the Lasso Tool allows you to draw a selection area of any shape and size, so be sure you select enough of the area around the eye to actually change the shape of your entire eye instead of just replace the eyeball.
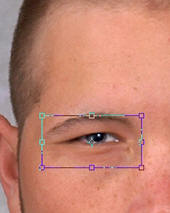
Let's get the new eye to be the same size as your eye.
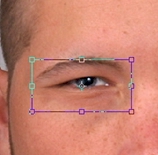

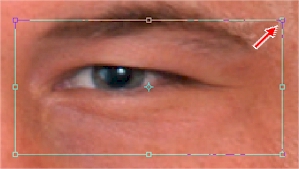
ROTATING THE EYE
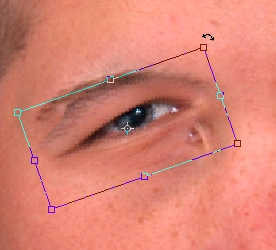
It never fails: someone in their picture has their head tilted, or turned, or is looking up or down, or something along those lines (it may have even been YOU). If you want to use features from one of these people, it will be necessary for you to rotate the new eye so that it more preciously matches your current eye. Let's take a quick look at how to do this (if you don't need to rotate an eye, simply read through the following section as you may need to rotate another piece of face that you are using from another person's photo later in this project).
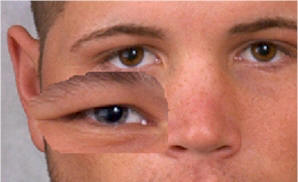
SHARP EDGES
With the eye in the proper position and approximately the correct size, we can now begin to smooth it out and get it looking like it belongs on your face. Hard, sharp, and unnatural looking edges will cause your image to look artificial and will cost you valuable points, so always take the time to make sure that your new facial items blend in with your face and look as natural as possible. Look at the graphic below...
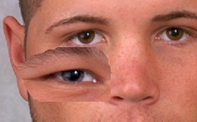
Notice the hard edge between the new eye and the original face? Once again, we have an easy fix in these situations.
Notice that when you click, the edge will appear smooth and will seem to blend into the background.

This is a good time to point out that not every facial feature will look perfect (or even good) when placed on your face. All of our faces are a different shape, and you will be morphing the pieces to fit your face. It is OK that it does not look perfect (in fact, it is not supposed to look perfect...where is the fun in that?).
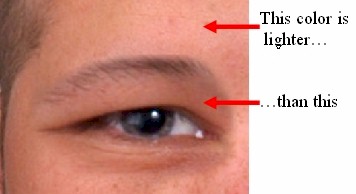
ADJUSTING SKIN COLOR
One final issue we need to deal with is that we all have different skin color, but we want our final product to appear as natural as possible. The skin around your new eye is likely lighter or darker than your actual skin color...
This is a good time to point out that if you do not have any skin around your eye YOU DID IT WRONG. As discussed earlier, you need to include the area around their eye and not just the eyeball so that you actually reshape your eyes and not just give yourself different colored pupils. If this applies to you, delete your eye layer and go back right now and do it correctly, otherwise you will loose points.
Correcting the skin tone problem involves using Photopea's Adjustments tool...

Which Adjustment you use depends on the two images you are trying to match up, so you will need to experiment with several of them until you find one that does the job. This tutorial will NOT go into detail of how all of the Adjustments work. Use the sliders to adjust the color of the new eye and be sure the Preview box is checked so you can immediately see the changes you make. All of the adjustments have a different impact, but you likely want to give Levels, Hue/Saturation, Desaturate, Brightness/Contrast, or Color Balance a try first. Keep in mind that it may be necessary to use more than one Adjustment to get the desired result - just experiment until the new eye's skin color matches your face's natural skin color. You have worked with the various Adjustment tools enough up to this point to know how they work and what you need to do.
I can not tell you exactly how to do this, you must use trial and error to figure it out. There are far too many skin color variations and combination possibilities for us to discuss how all of them work, so you are on your own this time. Don't worry, I am confident in your ability to figure this out.
REPAIRING SHADOW
If the problem is not skin color but shadow, we must use a different solution. This process is really only necessary if your face has significant shadows, which it should not if the original picture was taken correctly. If the eyes you pulled off another person have shadows, you can use the color variation tips above to correct this. If your face is the one with the shadow, you need to add shadows to the new eyes so they match your face, here is how to do it.

We have done a great deal of detailed work, but at this point we only have one new eye. So.............
When finished, you should have two new eyes that reshape your eyes, are the correct size and orientation, have smooth edges so they blend into your face, and match your skin tone...

Save As PSD in your A New Me folder as ANewMe_name.psd
When you are satisfied with your eyes, it is time to move on to your hair.
|
Step 1: A New Me | Step 2: Eyes | Step 3: Hair | Step 4: Ears | Step 5: Mouth | Step 6: Nose |
|